Trimming typography with Stitches and Capsize

Spencer Miskoviak
July 1, 2023

Photo by Merve Sehirli Nasir
Spacing can seem like a minor detail in an overall design when considering everything like colors, components, content, user experience, animation, etc. While these are all important, spacing can ultimately make or break a design.
You might have intuitively felt this before when seeing a design, app, or website that had a polished visual design that looked great, but something "felt off." There's a good chance it was the spacing.
A common solution is to define a spacing scale in a design system, following some convention, such as a spacing scale using "powers of two". Designers and engineers can speak the same "spacing language" and ensure consistent, thoughtful spacing throughout.
This works great for things like buttons and cards. However, there's one thing that makes this challenging: text. Text nodes have extra white space that varies depending on the font. As a result, when using the spacing scale with text nodes that have extra white space it results in a total visual spacing that does not exist in the spacing scale. This can result in the spacing feeling off anywhere there is text. For example, the space between paragraphs or the padding surrounding text within a button.
Fortunately, there's Capsize which solves this problem and trims the extra white space from typography allowing for precise styling.
There are many ways to use it, but this blog post will outline how to integrate Capsize with Stitches in a Nextjs app.
Capsize
Capsize removes whitespace surrounding typography, allowing more precise control over visual spacing.
Capsize makes the sizing and layout of text as predictable as every other element on the screen. Using font metadata, text can now be sized according to the height of its capital letters while trimming the space above capital letters and below the baseline.
Stitches
Stitches is a styling library.
CSS-in-JS with near-zero runtime, SSR, multi-variant support, and a best-in-class developer experience.
Note: Stitches is currently unmaintained, but this general approach should work for most CSS-in-JS styling libraries.
Integration
The first step is to create a Nextjs app and setup Stitches.
Install & Setup
Stitches provides a setup guide to use with Nextjs, which we can follow.
Start by creating a new Nextjs app.
npx create-next-app@latest
Configure the Nextjs app selecting the relevant options.
Below are the options selected for this blog post example.
✔ What is your project named? … nextjs-stitches-capsize
✔ Would you like to use TypeScript with this project? … No / *Yes*
✔ Would you like to use ESLint with this project? … No / *Yes*
✔ Would you like to use Tailwind CSS with this project? … *No* / Yes
✔ Would you like to use `src/` directory with this project? … No / *Yes*
✔ Use App Router (recommended)? … *No* / Yes
✔ Would you like to customize the default import alias? … *No* / Yes
Once done generating, change into the project directory.
cd nextjs-stitches-capsize
Then, install Stitches.
npm i @stitches/reactNext, configure the Nextjs _document.tsx to inline the Stitches style using the getCssText. This inlines the styles in the head when server rendering to prevent the flash of unstyled content.
// src/pages/_document.tsx

import NextDocument, { Html, Head, Main, NextScript } from "next/document";
import { getCssText } from "../../stitches.config";

export default class Document extends NextDocument {
  render() {
    return (
      <Html lang="en">
        <Head>
          <style
            id="stitches"
            dangerouslySetInnerHTML={{ __html: getCssText() }}
          />
        </Head>
        <body>
          <Main />
          <NextScript />
        </body>
      </Html>
    );
  }
}
Styles can now be defined and applied using Stitches within the Nextjs app.
We'll quickly define some global style resets in the Nextjs _app.tsx. This isn't necessary for the purposes of typography trimming.
// src/pages/_app.tsx

import type { AppProps } from "next/app";
import { globalCss } from "../../stitches.config";

const globalStyles = globalCss({
  body: {
    background: "$surface",
  },
  "*": {
    margin: 0,
    padding: 0,
  },
});

export default function App({ Component, pageProps }: AppProps) {
  globalStyles();

  return <Component {...pageProps} />;
}
Stitches theme configuration
Now that Stitches it setup, a custom theme can be defined.
The following is a basic Stitches theme configuration. The most important are the font sizes and line heights, which we'll be using with Capsize. The other values are configured for demo purposes.
// stitches.config.ts

import { createStitches } from "@stitches/react";

export const { styled, getCssText, globalCss, theme } = createStitches({
  theme: {
    // Basic font sizes and line heights.
    // These can be updated to the desired size/height, added/removed, etc.
    fontSizes: {
      xsmall: "12px",
      small: "14px",
      medium: "16px",
      large: "20px",
      xlarge: "24px",
    },
    lineHeights: {
      xsmall: "16px",
      small: "18px",
      medium: "21px",
      large: "26px",
      xlarge: "32px",
    },
    // Basic colors.
    colors: {
      surface: "#fefae0",
      content: "#283618",
      highlight: "#dda15e",
    },
    // Basic spacing scale.
    space: {
      small: "8px",
      medium: "16px",
      large: "24px",
    },
  },
});
These defined design tokens can now be used throughout Stitches style definitions to ensure consistent styling.
Stitches Text component
Now that Stitches is setup and the theme is configured, a Text component can be built using these design tokens.
The following component will render text at different sizes based on the theme configuration.
// src/pages/index.tsx

import { Stack } from "@/components/Stack";
import { Inter } from "next/font/google";
import { styled } from "../../stitches.config";

const inter = Inter({ subsets: ["latin"] });

export default function Home() {
  const content = "Hello, from Next.js, Stitches, and Capsize!";

  return (
    <Main className={inter.className}>
      <Stack>
        <Text size="xlarge">{content}</Text>
        <Text size="large">{content}</Text>
        <Text size="medium">{content}</Text>
        <Text size="small">{content}</Text>
        <Text size="xsmall">{content}</Text>
      </Stack>
    </Main>
  );
}

const Text = styled("p", {
  background: "$highlight",
  variants: {
    size: {
      xsmall: { fontSize: "$xsmall", lineHeight: "$xsmall" },
      small: { fontSize: "$small", lineHeight: "$small" },
      medium: { fontSize: "$medium", lineHeight: "$medium" },
      large: { fontSize: "$large", lineHeight: "$large" },
      xlarge: { fontSize: "$xlarge", lineHeight: "$xlarge" },
    },
  },
});

const Main = styled("main", {
  minHeight: "100vh",
  display: "flex",
  alignItems: "center",
  justifyContent: "center",
});
The styling and variants are handled with Stitches, while Nextjs takes care of rendering the page and loading the Inter font using Nextjs fonts.
Then the Nextjs app can be started and the text should render.
npm run devWhen opening in a browser, you should see something like the following.
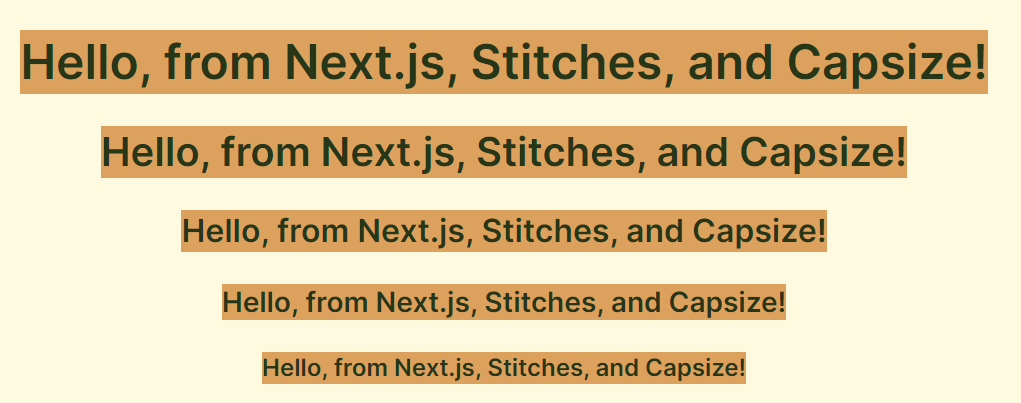
Note the extra spacing between the top and bottom of the text and it's container (the orange).
This extra spacing can be removed with Capsize.
Capsize integration
First, install the two Capsize packages.
npm i @capsizecss/core @capsizecss/metricsThe first package provides the logic to perform the typography trimming. The second package contains metrics for many of the common fonts that are used as input to perform the typography trimming since each font is different.
Then, in a new Text.tsx file with the original Text component moved over, it can be modified to make use of the Capsize APIs to compute styles to trim the font to the exact height of capital letters and allowing for precise spacing.
// src/components/Text.tsx
import { createStyleObject } from "@capsizecss/core";
import { styled, theme } from "../../stitches.config";
import fontMetrics from "@capsizecss/metrics/inter";

// Convert a string pixel value like "16px" to a number like 16.
const parsePx = (value: string) => parseInt(value.replace("px", ""), 10);

/**
 * Given a font size from the Stitches theme, create a font size variant
 * using Capsize that is compatible with Stitches styling.
 */
const createFontSizeVariant = (size: keyof typeof theme.fontSizes) => {
  // Parse the font size and line height from the Stitches theme.
  const fontSize = parsePx(theme.fontSizes[size].value);
  const leading = parsePx(theme.lineHeights[size].value);

  // Create a CSS style object using Capsize.
  const styles = createStyleObject({
    fontSize,
    leading,
    fontMetrics,
  });

  // Convert the CSS style object into a Stitches style object.
  return {
    fontSize: styles.fontSize,
    lineHeight: styles.lineHeight,
    "&::before": {
      ...styles["::before"],
    },
    "&::after": {
      ...styles["::after"],
    },
  };
};

export const Text = styled("p", {
  fontWeight: 600,
  color: "$content",
  backgroundColor: "$highlight",

  // Apply all font size variants. This is the most explicit approach, but the
  // variants could also be dynamically constructed from the theme so
  // anytime it changes the variants are automatically updated.
  variants: {
    size: {
      xsmall: {
        ...createFontSizeVariant("xsmall"),
      },
      small: {
        ...createFontSizeVariant("small"),
      },
      medium: {
        ...createFontSizeVariant("medium"),
      },
      large: {
        ...createFontSizeVariant("large"),
      },
      xlarge: {
        ...createFontSizeVariant("xlarge"),
      },
    },
  },
});
Then, update the original root page to use this Text component and remove the local component.
// src/pages/index.tsx
import { Stack } from "@/components/Stack";
import { Inter } from "next/font/google";
import { styled } from "../../stitches.config";
import { Text } from "@/components/Text";

const inter = Inter({ subsets: ["latin"] });

export default function Home() {
  const content = "Hello, from Next.js, Stitches, and Capsize!";

  return (
    <Main className={inter.className}>
      <Stack>
        <Text size="xlarge">{content}</Text>
        <Text size="large">{content}</Text>
        <Text size="medium">{content}</Text>
        <Text size="small">{content}</Text>
        <Text size="xsmall">{content}</Text>
        <Text size="small" highlighted={false}>
          This is a demo Next.js application using Stitches for styling and
          Capsize for trimming typography.
        </Text>
      </Stack>
    </Main>
  );
}

const Main = styled("main", {
  minHeight: "100vh",
  display: "flex",
  alignItems: "center",
  justifyContent: "center",
});
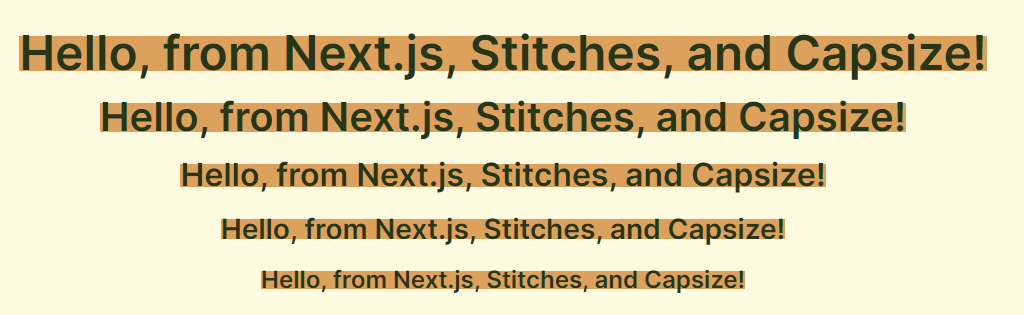
Now, restarting or refreshing the page should display text that touches the edges of it's container. Note how the space between the text is now exactly as defined by the Stack component and not more if that orange background weren't there.
Conclusion
Spacing is crucial to an effective design, but text has made consistent styling notoriously challenging. Fortunately, by integrating Capsize this challenge can be solved.
All of this code integrating Capsize with Nextjs and Stitches is available on GitHub.
Tags:
course
Practical Abstract Syntax Trees
Learn the fundamentals of abstract syntax trees, what they are, how they work, and dive into several practical use cases of abstract syntax trees to maintain a JavaScript codebase.
Check out the course